Last weekend we ran a workshop at the Digimakers event at @Bristol where we taught people how to program a Raspberry Pi robot with the Scratch programming language. It went really well, and it was amazing to see kids as young as 7 grasp the basics of robot control, and produce some really good control programs. Quite frankly, our careers are obviously in jeopardy once they reach the jobs market. ![]()
This is the first in a series of posts where we describe the basics of how we built the robot, programmed it and put on the workshop. All of the workshop code, and the workshop worksheet can be found here if people are interested in recreating our work.
Aim of the Workshop
This workshop asked the students to write a control program for a robotic rover that had been landed on Mars by NASA. The robot had to explore an area of Mars strewn with rocks (in this case cardboard boxes) in order to find an alien artifact which was represented by an Augmented Reality (AR) marker. This was inspired by some robot rover lessons that our friend Graham Taylor at Raspberry Pi School put together for his wife’s primary school.
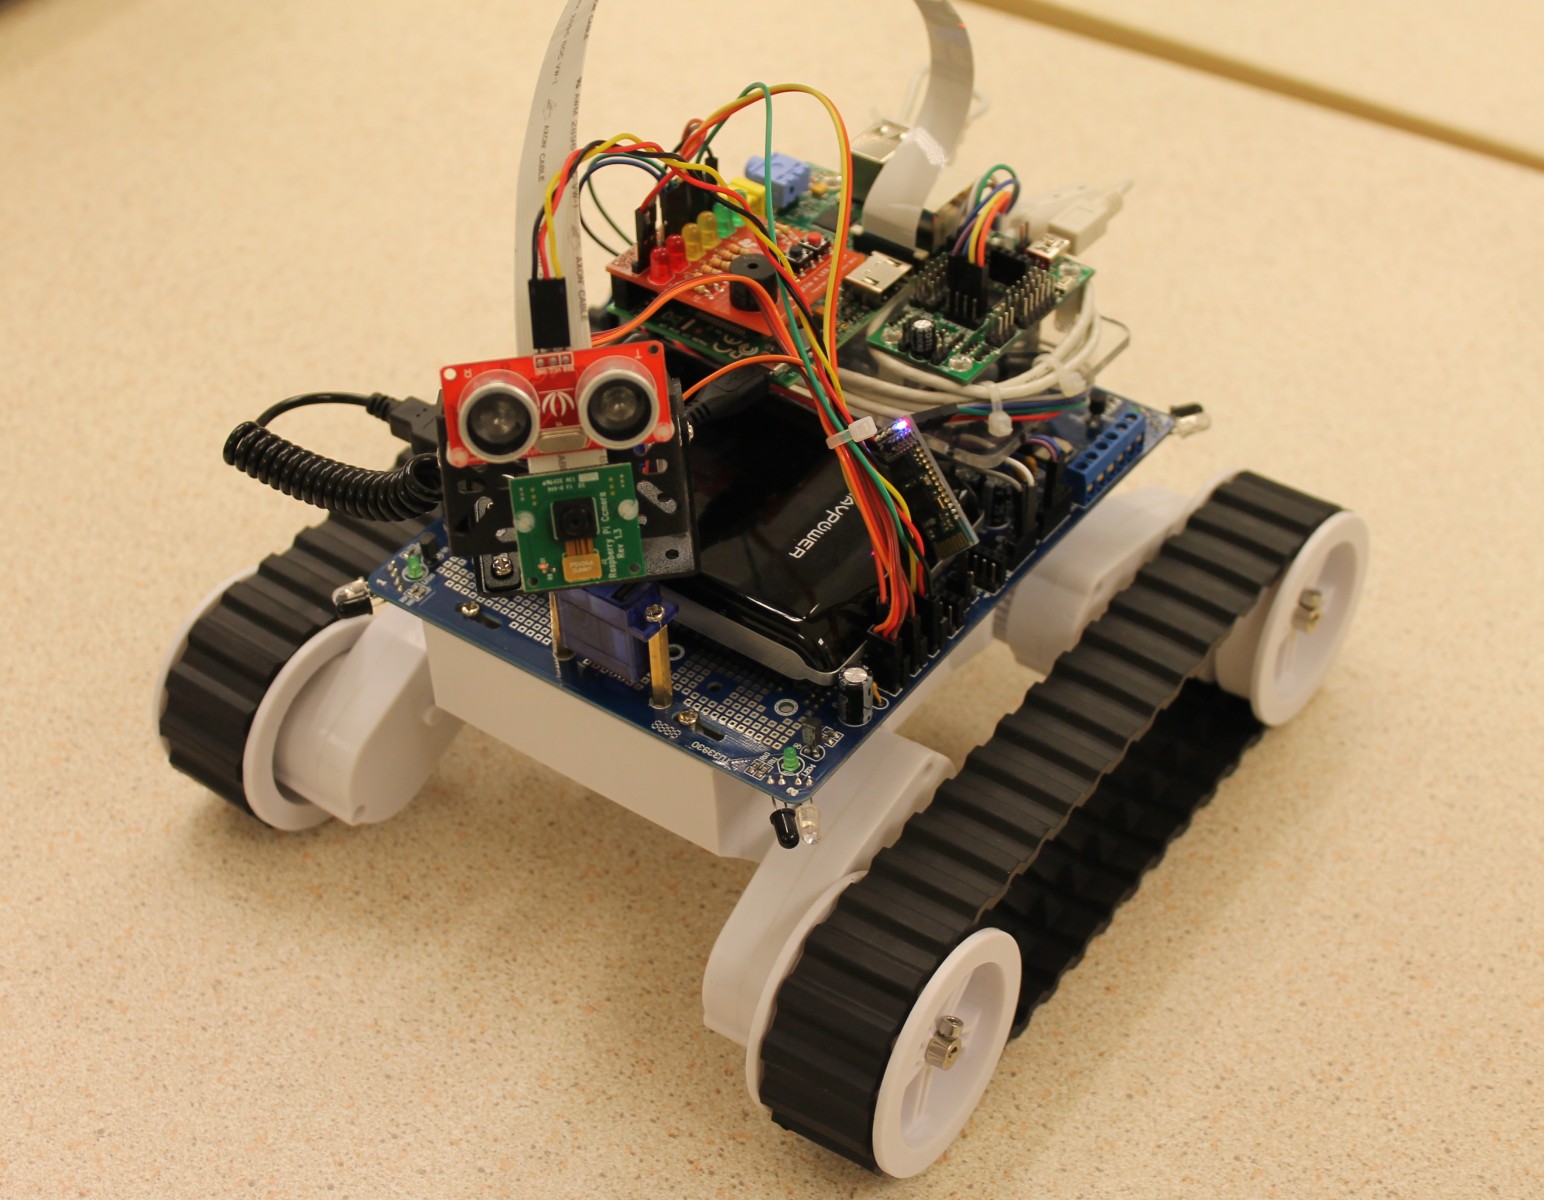
The Raspberry Pi Robot used for the workshop
The students were each given an SD card to put into their Raspberry Pis that contained Scratch and a simple robot simulator running in the background. This allowed them to write their control programs in a simulation environment first, before moving over to the real robot. Once the students had perfected their control programs, they put their SD card into our laptop which was communicating with the Raspberry Pi robot using bluetooth. This allowed their Scratch programs to control the robot. At this point they learnt that the behaviour a robot in a simulator doesn’t necessarily correspond precisely to the behaviour of a robot in real life. Due to low level controller issues and wheel slippage on the carpet, turns weren’t exactly 90 degrees, and the robot didn’t always go the exact distance it was told to. Cue back and forth debugging sessions as the young robot programmers tuned their control programs. ![]()
Building the Raspberry Pi Robot

The robot has both a camera, and an ultrasonic sensor
Our Raspberry Pi robot is adapted from the Seeeduino/Arduino Robot Kit that we sell. This was extended in a number of ways. We first laser cut am acrylic support platform to mount the Raspberry Pi, although cardboard would have worked just as well. We then took advantage of the extra processing power of the Pi to mount the Pi camera on the Pan/Tilt head, alongside the ultrasonic range sensor.
The batteries in the Rover 5 chassis, may well be able to run the Pi as well as the motors, but for stability, we decided to give the Pi a power supply of its own in the form of a USB power bank.
The Raspberry Pi can produce the PWM signals needed to drive the motors of the robot, but we found that we couldn’t accurately keep track of the pulses generated by the chassis encoders with the Raspberry Pi. We were trying to use GPIO interrupts in Python, but when the wheels started turning quickly, our code just couldn’t keep up. Now doubtless, with better code, or a C/C++ extension we may have been able to solve this, but in the end we decided to offload the control of the motors and the reading of the encoders to a small Arduino compatible board, the Dagu Arduino Mini Driver. The Arduino Mini Driver runs a simple program that listens for commands from the Raspberry Pi, and constantly streams back encoder readings. This is a great example of how simple tasks can be offloaded to a micro-controller, freeing up the Pi to handle higher level logic. The sketch for the Arduino Mini Driver can be found here.

The hardware used to build the robot. Showing a USB power bank, BerryClip+, Arduino Mini Driver, and a Bluetooth module (the thing with the lit red LED).
In addition to the Arduino Mini Driver, we also added a serial Bluetooth module for wireless control, and a BerryClip so that we could use its LEDs and buzzer to provide feedback on the state of the robot. The BerryClip shown here is actually a prototype of the new, expanded version of the BerryClip, the BerryClip+, so many thanks to Matt Hawkins, owner of Raspberry Pi Spy, and creator of the BerryClip for loaning it to us.
Next Time…
In this article, we’ve outlined the hardware we used to build our Raspberry Pi Robot. In the next article we’ll talk about the software that we wrote to control the robot, and how to install it all on an SD card for the robot.
Excellent
Pingback: Building a Raspberry Pi Robot and Controlling i...
Could you provide a more detailed construction of this pi robot? I would like to replicate it!
Hi Umair,
Thanks for the comment. Glad you like the robot. This robot was a little bit thrown together for the workshop we taught, so what we’re planning to do is at some point provide a Raspberry Pi version of our Rover 5 Robot kit.
This is not too hard to do, the Raspberry Pi needs to be powered by a USB powerbank such as this one, but it can then be connected to the Seeeduino using the USB cable supplied in the kit. The open source software we wrote for the Raspberry Pi Camera Robot we sell can then be adapted to work with the Rover 5 robot.
Having said that it’s not too hard. It’s still probably going to take us at least a month and a half to release this kit, as, with so many things, it’ll take time, which we’re lacking at the moment.
Regards
Alan
I would love to replicate it too!!
I am just starting to get into robotics and I am excited to make this but is it an exact replica of the mars rover or is it a bit different i know it is small.
Hi Rebekah,
Not a replica, just ‘inspired by’.
Regards
Alan
Hi, is there any news on the kit & fuller tutorial being available?
Hi Lawrence,
Thanks for your interest. This is ongoing, but it’s slipped to more of a ‘it’ll be done when it’s done’ schecule, just because I’m not getting as much time to focus on it as I’d like.
Regards
Alan
I am saving up to get the rover and the raspberry pi upgrade, so I have commented to get any updates to this post.
As an absolute beginner, anybody else’s advice will be appriciated.
Regards
A